Remember when your parents used to say, “You kids don’t know how good you have it?” Now that you’re an adult, you understand all too well about the fun duties that come with being a grown-up: Paying bills, working long hours, household chores, and the list goes on. Becoming a homeowner is a big adult milestone, but it also comes with great responsibility (almost as much responsibility as being Spiderman????).
Among those responsibilities are maintaining the major systems in your home to help them last as long as possible and prevent expensive breakdowns from occurring. So today, we’re going to give you a fun adult task to add to your annual home maintenance list: Flushing your water heater.
Flushing your water heater at least once a year is the most important thing you can do to extend its life and prevent it from needing major repairs as it ages. The average water heater should last between 10-12 years, but you can extend the life of your water heater in 4 simple steps when flushing it annually!
Step 1: Turn the Power Off
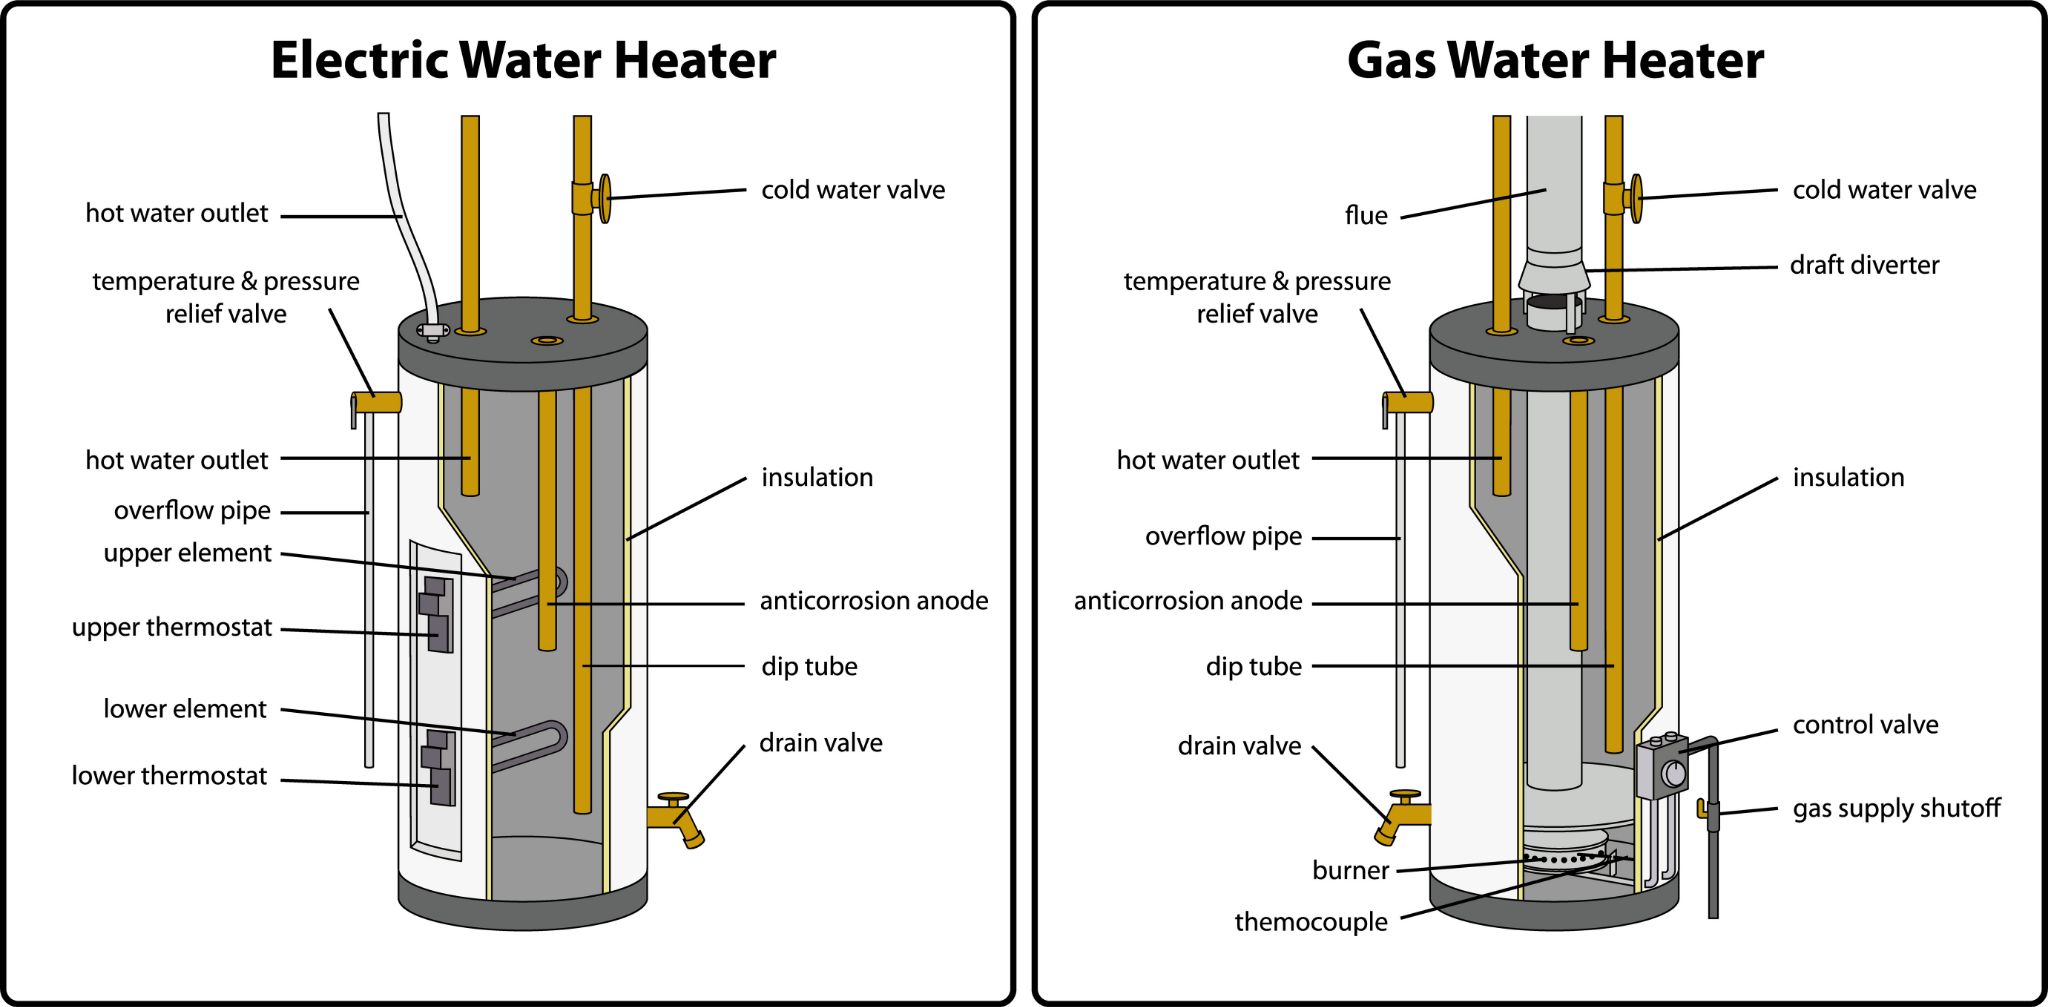
Above is a diagram of both an electric and gas water heater so you can refer to that as we discuss the steps to flush your water heater properly. The first step is shutting the power off. If your water heater is electric, look for the breaker and turn off the electrical power to the burner. If you have a gas water heater, simply turn off the gas valve that fuels the burner at the bottom of the tank, as you’ll see in the diagram above.
This allows your water to cool down before you get started so you’re not dealing with scalding hot water. Typically, this can take an hour or up to two hours for some larger water heater tanks.
Step 2: Turn Off the Water
Next, close the cold water valve, normally located at the top of the tank as pictured. This will stop the supply of water from filling the tank as you work on flushing it. This way you can be certain you are completely draining your tank of water and all the gunk that may be accumulated in there.
Step 3: Drain the Tank
The drain valve is located at the bottom of your water heater tank, normally about 6 inches above the ground. Attach a garden hose from outside to this valve, and make sure it is threaded on tightly to prevent leaks. We recommend putting a bucket under the drain valve just in case.
To get all the dirt, minerals, and deposits out of the bottom of your tank, where it has likely settled if you haven’t flushed it regularly, you need to run the hose outside or to the closest drain so you don’t end up with a mess. From there, open the pressure relief valve (located near the top of your tank above the overflow pipe that extends down the side. By opening this valve, it prevents a vacuum from occurring so you can easily get a strong flow of water running through your hose to completely drain the sediment from your tank.
Once you notice the water running clear, congrats! You’ve successfully flushed your water heater of all the build-up that has been accumulating at the bottom, and you’ve effectively improved your water heater’s functionality and extended its life expectancy!
Step 4: Open Valves Back Up
Now that Mission Water Heater Flush has been accomplished, you need to get your water heater up and running again. So detach your hose from the drain valve, and always refill your tank with water before turning on the heating element or you risk burning it out, which will only result in a call to your plumber.
In order to turn the water back on, open the cold water valve again and get the water flowing back in. Once full, open the gas valve again or ignite the pilot light by turning on the electrical breaker again to begin heating your tank once again. Now, pat yourself on the back because you’ve successfully flushed your water heater and got it back up and running!
Additional Water Heater Tips and Tricks:
Ideal Water Heater Temperature:
The average household sets their water heater to 120 degrees, but if you want to conserve energy, keep in mind that for every 10 degrees you lower your temperature, you’ll save an estimated 5% off on your water heater’s operating costs.
Anode Rod Exam:
Your anode rod is an important part of your water heater inside your tank. Since water contains a lot of particles like chlorine, fluoride, and magnesium, these particles will unfortunately corrode the inside of your tank over time. The anode rod is made up of aluminum or magnesium and will work like a magnet to attract these particles to it to prevent corrosion inside your tank. In order to ensure the rod functions properly, it’s a good idea to have periodic water heater inspections by a trusted plumber. Anode rods are factory installed so if a plumber does determine that it to be replaced, it’s best to have a professional remove it and replace it to make sure it’s done properly. This will help to extend the life of your water heater in addition to flushing it annually.
Water Heater Problems?
If your water heater is exhibiting the following signs, it may be time to call a plumbing company near you:
- Your warm water becomes cold quickly or stays lukewarm most of the time
- You notice your water heater is leaking
- Rust and corrosion inside your tank or even visible rust in your water
- It’s making noises or rumbling sounds
We have 24/7 emergency plumbing available and can get you on our schedule quickly if you need a water heater inspection or replacement. In fact, we provide 1-Day water heater replacements if you need a new one right away! While we hope your water heater functions optimally for years to come with annual flushes, if you happen to need a plumbing professional to provide an inspection, we are only a phone call away at 269-468-6682!